You've chosen the wood species and you know the room dimensions. Now comes the question that trips up more commercial sauna projects than it should: exactly how many square metres of panelling, how many linear metres of bench wood, and how many boards do you actually order? Order too little and the project stalls waiting on a second delivery in a matching batch; order too much and you've tied up budget in timber that sits in a warehouse. This article is not about which wood to pick — it's about how much to buy once that decision is made.
If you're a hotel project buyer, a fit-out contractor, a sauna-room manufacturer or a bulk timber purchaser, this walks through calculating sauna panelling and bench wood from a drawing: wall and ceiling areas, deducting openings, the gap between nominal and actual coverage width, why bench boards are counted separately, cutting waste, spares, and totalling across multiple identical rooms — ending with a worked example material list you can adapt.
Already still deciding on species? See our companion article, How Do You Choose the Right Wood for a Sauna Room? This article assumes the species is already fixed and focuses purely on quantities.
Why Cladding and Bench Wood Are Calculated Separately
Before any numbers, one principle saves a lot of ordering errors.
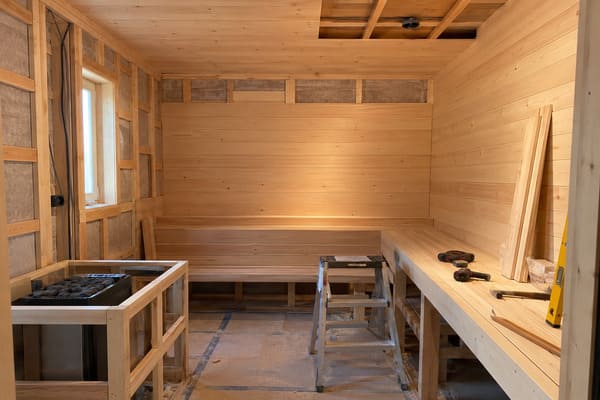
Sauna panelling (wall and ceiling cladding) and bench wood are calculated separately because they are different products, sold in different profiles, and estimated by different units. Cladding is thin tongue-and-groove board that lines walls and ceilings, and is best estimated by surface area (square metres). Bench wood is thicker, wider timber used for seating slats, front aprons and supports, and is best estimated by linear metres of a given profile. Mixing them into a single "wood" figure leads to under- or over-ordering, because their coverage, thickness, waste rates and even wood species are often different.
The practical split for most commercial rooms:
- Cladding / panelling — the wall and ceiling lining. Estimated by area (m²), then converted to boards or packs using the board's actual coverage width. Often a lighter, knot-free species chosen for appearance and low heat retention.
- Bench wood — seating slats, backrests, front aprons and bearers. Estimated by linear metres (lm) of each profile, because benches are runs of a fixed board width. Often a low-conductivity species that stays comfortable against skin.
Because these can even be different species, keep them on separate lines from the very start of your take-off. You'll browse both as distinct product groups anyway — see the Wood & Benches catalogue for the cladding and bench profiles available.
Calculating Wall and Ceiling Area from the Drawing
Cladding starts with a clean area take-off.
To calculate sauna cladding area from a drawing, work out the area of each wall (width × height) and the ceiling (length × width), then add them together for a gross panelling area in square metres. Do this wall by wall rather than estimating the whole room at once, so you can account for different wall heights, the ceiling separately, and any partial walls or bulkheads. This gross area is your starting figure — before deducting openings and before adding waste.
A simple, reliable method:
- List every surface — each wall, plus the ceiling, as its own line. Don't forget the wall above the door and any bulkhead or dropped-ceiling sections.
- Measure from the drawing — width × height for each wall; length × width for the ceiling. Use the internal sauna dimensions (the finished lining face), not the external shell.
- Sum to a gross area — add all surfaces for a total gross m² of sauna panelling. This is the number you'll refine in the next two steps.
Keeping each surface on its own line matters later: it makes deducting doors and windows accurate, and it lets you plan board lengths wall by wall.
Deducting Doors, Windows and Openings
Gross area isn't net — openings come out, but carefully.
Deduct the area of doors, windows and any large openings from the gross cladding area to get a net area, but do so conservatively. Calculate each opening's area (width × height) and subtract it, yet don't assume a 100% saving: the offcuts around an opening are often unusable, and you still need full boards to frame it. A common approach is to deduct the opening area but keep a healthy waste allowance (covered next) so the framing offcuts around doors and glass panels are accounted for. For small openings, some estimators don't deduct at all, treating them as part of the waste buffer.
Practical rules of thumb:
- Large openings (glass fronts, big windows) — deduct the area; they genuinely remove a lot of cladding. But keep the waste allowance, because boards still have to be cut and fitted around the frame.
- Doors — deduct the door leaf area if it's a solid or glass door that isn't clad; keep it if you're cladding a wooden door to match.
- Small openings (vents, control cut-outs) — usually not deducted; they're small enough to fall inside your waste buffer.
The goal is a net panelling area that's realistic — not so generous it under-orders, not so literal it ignores framing offcuts.
Nominal Width vs Actual Coverage Width — the Key Trap
This single distinction causes more shortfalls than any other, so it gets its own section.
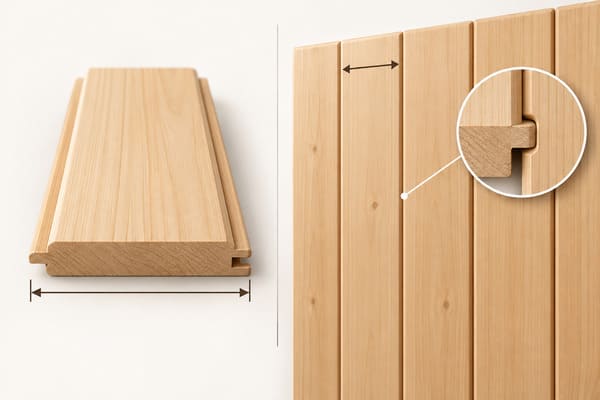
The most common ordering mistake is using a board's nominal width instead of its actual coverage width. Tongue-and-groove sauna cladding has a nominal (overall) width, but part of the board is lost into the joint when it's fitted, so the exposed "coverage" or "face" width that actually covers the wall is smaller. Always convert your net area to boards or packs using the coverage width, not the nominal width — otherwise you will order too little. Board packs usually state a coverage figure (m² per pack); use that number for ordering.
How it works in practice:
- A board might be sold as, say, a nominal width, but once the tongue seats into the next board's groove, the actual covered face is narrower.
- If you divide your area by the nominal width, every board "covers" less than your maths assumed — and across a whole project the shortfall adds up to missing boards.
- Use the coverage width (or the "m² per pack" the supplier states, which is already based on coverage). This is the single most important number in the whole take-off.
When comparing quotes, check every supplier is quoting coverage m², not nominal — otherwise you're comparing different things. Reputable timber suppliers state coverage clearly; if a quote only gives nominal dimensions, ask for the coverage figure before you order.
Bench Wood: Counting Seating Separately in Linear Metres
Benches follow their own logic — by the metre, not the square metre.
Bench wood is calculated in linear metres of each board profile, not by area. Work out the total run of seating: for each bench tier, multiply its length by the number of slat rows across its depth to get linear metres of slat, then add linear metres for front aprons, backrests and any visible trim. Bearers and hidden framing are counted separately again, often in a structural timber rather than the finished bench species. Keep upper and lower benches, backrests and aprons on separate lines, because they may use different board widths or profiles.
A clean bench take-off:
- Slats — for each tier: bench length × number of slat runs across the depth = linear metres of slat board. Include the small gaps between slats in your spacing, but count the boards themselves.
- Aprons and fronts — the visible face board along the front edge of each tier, in linear metres.
- Backrests / trim — any wall-mounted back boards or edge trim, in linear metres.
- Bearers / framing — the structural supports under the benches, usually a separate structural timber, counted on their own line.
Because bench wood is thicker and often a different species from cladding, never fold it into the cladding area figure. Browse bench profiles alongside cladding in the Wood & Benches range.
Board Lengths, Cutting Waste and Spare Material
Now turn clean areas and lengths into a realistic order — with waste built in openly.
After calculating net cladding area and bench linear metres, add an allowance for cutting waste and spare material before ordering. Cladding and bench boards come in fixed lengths, so there is always offcut waste when boards are cut to fit walls and benches; a typical allowance is around 10% for straightforward rectangular rooms and more for rooms with many openings, angles or short walls. On top of waste, order a small quantity of spare boards in the same batch for future repairs and colour-matching. State your waste assumption openly rather than hiding it in a single blanket figure, so the client can see how the final order was built.
Three things to add on top of net quantities:
- Cutting waste — because boards come in fixed lengths, cutting to fit always creates offcuts. Around 10% suits simple rectangular rooms; increase it for rooms with many openings, angles, tiered benches or lots of short walls where offcuts can't be reused. Choosing board lengths that divide neatly into your wall dimensions reduces this waste.
- Board-length planning — where possible, pick supplied lengths that fit your wall runs with minimal offcut. This is where doing the take-off wall by wall pays off.
- Spares in the same batch — order a few extra boards from the same production batch for future repairs, so grain and colour match. Timber colour shifts between batches, so a matching spare ordered later rarely blends in.
Crucially, keep the waste rate visible and per-section, not a single mystery percentage. A client can trust "net area + 10% waste + spares" far more than one rounded lump sum.
Totalling Across Multiple Identical Rooms
Big projects repeat rooms — so total them the right way.
When a project has several identical sauna rooms, calculate one room fully, then multiply — but total the raw quantities before rounding up to whole packs. Work out the net cladding area and bench linear metres for a single room, multiply by the number of rooms, and only then convert to full board packs and add the batch spares. Rounding each room up to whole packs individually wastes material, because partial packs from one room can serve the next. For mixed room sizes, group identical rooms together and total each group separately.
The efficient method:
- Calculate one room fully — net cladding area, bench linear metres, per the steps above.
- Multiply by quantity — total the raw area and lengths across all identical rooms first.
- Then convert to packs and round up once — at the project total, not per room. This avoids paying for a rounded-up partial pack in every single room.
- Add batch spares once — for the whole project, so all rooms share a matching repair stock.
For projects with different room sizes, split into groups of identical rooms and total each group; then combine for a single purchase order. Buying the whole project's timber in one matching batch is also the best guard against colour variation between rooms.
A Worked Example Material List
Here's how the whole method comes together in a transparent take-off. The figures below are illustrative placeholders to show the structure — replace them with your project's real numbers.
| Item | Basis | Calculation shown | Waste | Order qty |
|---|---|---|---|---|
| Wall cladding | Net area (m²) | Gross walls − openings | +10% | m² / packs (by coverage) |
| Ceiling cladding | Net area (m²) | Length × width | +10% | m² / packs (by coverage) |
| Bench slats | Linear metres | Tier length × slat runs | +10% | lm / boards |
| Bench aprons/fronts | Linear metres | Front-edge runs | +10% | lm / boards |
| Backrests / trim | Linear metres | Back-board runs | +10% | lm / boards |
| Bearers / framing | Linear metres | Support runs | +10% | lm (structural timber) |
| Batch spares | Fixed qty | Repair/colour-match stock | — | added once per project |
The point of laying it out this way is traceability: every final order quantity traces back through area or length → coverage/profile → waste → total. Anyone reviewing the order can see exactly how it was built — and a transparent list like this is far easier to check, quote and approve than a single lump figure. Note, too, that if you're importing sauna timber into the EU there are separate documentation requirements to plan for; see our guide to EUDR compliance for sauna timber buyers.
Turning Your Drawing into a Material List and Bulk Quote
With the method clear, the fastest route to accurate figures is to let us build the take-off with you.
For a commercial project, send us your room drawings, your chosen wood species (or preferences), and the project quantity, and we can turn them into an itemised material list — cladding area, bench linear metres, waste allowance, spares and total board packs — with a bulk quote to match. Because ROC Sauna-Solution supplies cladding, bench timber and the full Wood & Benches range and can source in matching batches, we can price the whole project as one coordinated order rather than room-by-room.
To give you an accurate list, it helps to include: internal room dimensions and ceiling height, the door and window sizes, your bench layout (tiers and depths), the wood species for cladding and for benches, and how many identical rooms the project has. With those, we can return a transparent, line-by-line material list and quote.
Conclusion
Once the species and room size are fixed, ordering sauna wood well is a calculation, not a guess. Split sauna panelling from bench wood; take off wall and ceiling area surface by surface; deduct openings sensibly; and — above all — convert area to boards using the actual coverage width, not the nominal width. Add bench wood in linear metres, build in a visible waste allowance plus batch spares, and total multiple rooms before rounding to whole packs. Do it this way and every figure on the order is traceable, checkable and right-sized — no stalled deliveries, no warehouse of surplus timber.
Have your sauna drawings and wood species ready? Send them to ROC Sauna-Solution and we'll turn them into an itemised material list — cladding, benches, waste and spares — with a bulk quote in a matching batch. Start your enquiry here. You can also ask our AI assistant your sauna panelling and timber questions.
Frequently Asked Questions
How do I calculate how much sauna cladding I need? Work out the area of each wall (width × height) and the ceiling (length × width) using the internal sauna dimensions, and add them for a gross panelling area. Deduct the area of doors, windows and large openings to get a net area. Then convert that net area to boards or packs using the board's actual coverage width — not its nominal width — because part of each tongue-and-groove board is lost into the joint. Finally, add a waste allowance (around 10% for simple rectangular rooms, more for rooms with many openings or angles) plus a few spare boards from the same batch. That gives a realistic order quantity for your sauna panelling.
What's the difference between nominal width and coverage width? Nominal width is the board's overall width; coverage (or face) width is the part that's actually exposed once the tongue seats into the next board's groove. The coverage width is smaller, so if you calculate your order using the nominal width you will order too little cladding. Always divide your net wall and ceiling area by the coverage width, or use the "m² per pack" figure the supplier states — that figure is already based on coverage. When comparing quotes, confirm every supplier is quoting coverage m², not nominal, so you're comparing like with like.
Why are bench wood and cladding calculated separately? Because they're different products estimated in different units. Cladding is thin tongue-and-groove board that lines walls and ceilings, best estimated by surface area in square metres. Bench wood is thicker, wider timber for seating slats, aprons, backrests and bearers, best estimated by linear metres of each profile. They often use different wood species too, and have different waste rates. Folding them into one "wood" figure leads to under- or over-ordering, so keep cladding (m²) and each bench component (linear metres) on separate lines from the start of your take-off.
How much waste should I allow when ordering sauna timber? A common allowance is around 10% for straightforward rectangular rooms, because boards come in fixed lengths and cutting them to fit always creates offcuts. Increase the allowance for rooms with many doors, windows, angles, tiered benches or lots of short walls, where offcuts are harder to reuse. On top of the waste allowance, order a small quantity of spare boards from the same production batch for future repairs and colour-matching, since timber colour shifts between batches. State the waste rate openly and per section rather than as a single blanket figure, so the final order is easy to check and approve.
How do I order sauna wood for several identical rooms? Calculate one room fully — net cladding area and bench linear metres — then multiply the raw quantities by the number of rooms before rounding up to whole packs. Only convert to full board packs and add batch spares at the project total, not per room, because partial packs from one room can serve the next; rounding each room up individually wastes material. For projects with different room sizes, group identical rooms together and total each group separately, then combine into one purchase order. Buying the whole project in a single matching batch also prevents visible colour variation between rooms.
References
[^1]: "(PDF) Full Take off of a Small Bungalow - Academia.edu", https://www.academia.edu/35231859/Full_Take_off_of_a_Small_Bungalow. A construction-estimating or sauna-construction source supports distinguishing finish cladding from bench or framing timber because they serve different functions and are measured from different dimensions; this is contextual support rather than proof of a universal estimating rule. Evidence role: general_support; source type: education. Supports: Sauna panelling and bench wood should be calculated separately because they are different products sold and estimated in different units.. Scope note: Estimating conventions vary by supplier, profile, and contract format. [^2]: "Thermal properties of human skin related to nondestructive ...", https://pubmed.ncbi.nlm.nih.gov/894074/. Research on thermal conductivity and contact heat transfer in wood supports that lower-conductivity materials transfer heat to skin more slowly, helping explain why wooden sauna benches can feel more comfortable than high-conductivity materials; the evidence is mechanistic rather than a direct test of every bench profile. Evidence role: mechanism; source type: paper. Supports: Bench timber is often selected for low conductivity so it remains comfortable against skin in hot sauna conditions.. Scope note: Actual perceived comfort depends on sauna temperature, wood moisture, board geometry, and user sensitivity. [^3]: "Wall Opening Deduction Measurement Guide - Home Measure Lab", https://homemeasurelab.com/guides/wall-opening-deduction-guide/. Standard building-measurement guidance commonly treats openings as deductions from wall finish areas above defined thresholds, supporting the practice of subtracting substantial doors and windows from cladding quantities; thresholds differ among measurement standards. Evidence role: general_support; source type: institution. Supports: Large doors, windows, and openings should normally be deducted from gross cladding area to calculate a net area.. Scope note: The exact deduction rule depends on the measurement standard, contract, and local estimating practice.