Water is the one thing a commercial sauna floor has to manage all day, every day — and it's the one thing most floors are built to ignore. Bathers drip, stones throw off steam, condensation runs down the walls, and staff hose the room down between sessions. All of that water ends up on the floor, and what happens to it next decides whether the sauna lasts decades or rots from the base up within a few years. The simplest way to build a sauna floor correctly is to follow the water: a good floor does three things with it — it contains water so it can't reach the structure, guides water so it never pools, and removes water through a drain. Get those three jobs right and the floor is sound. Get any one wrong and the whole build is at risk. This guide works through all three.
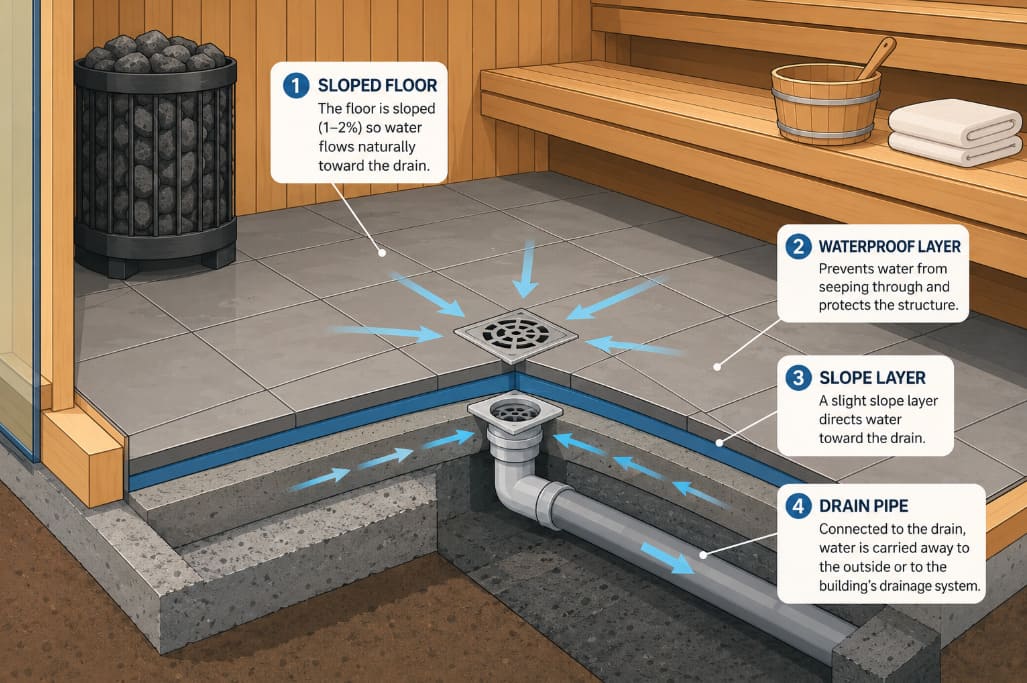
A commercial sauna floor has three jobs: contain water with a continuous waterproof membrane turned up the walls, guide it with a 1:50 to 1:100 (1–2%) slope toward the drain, and remove it through a corrosion-resistant, trapped floor drain. The finished flooring — tile or sealed concrete — must be slip-resistant and heat-stable, and where the sauna meets showers the whole wet area must be waterproofed and drained as one system. Wood should never be the primary waterproof floor.
Where the Water Actually Comes From
Before the three jobs, it's worth being clear about how much water a commercial sauna floor really deals with — because it's far more than most people assume.
A commercial sauna floor is wet almost constantly, from four sources: water thrown on the stones for löyly[^1], sweat and drips from bathers, condensation running down walls and benches, and daily wash-down cleaning. Unlike a home sauna used occasionally, a commercial floor never gets a chance to fully dry, so it must be built as a permanent wet-area floor.
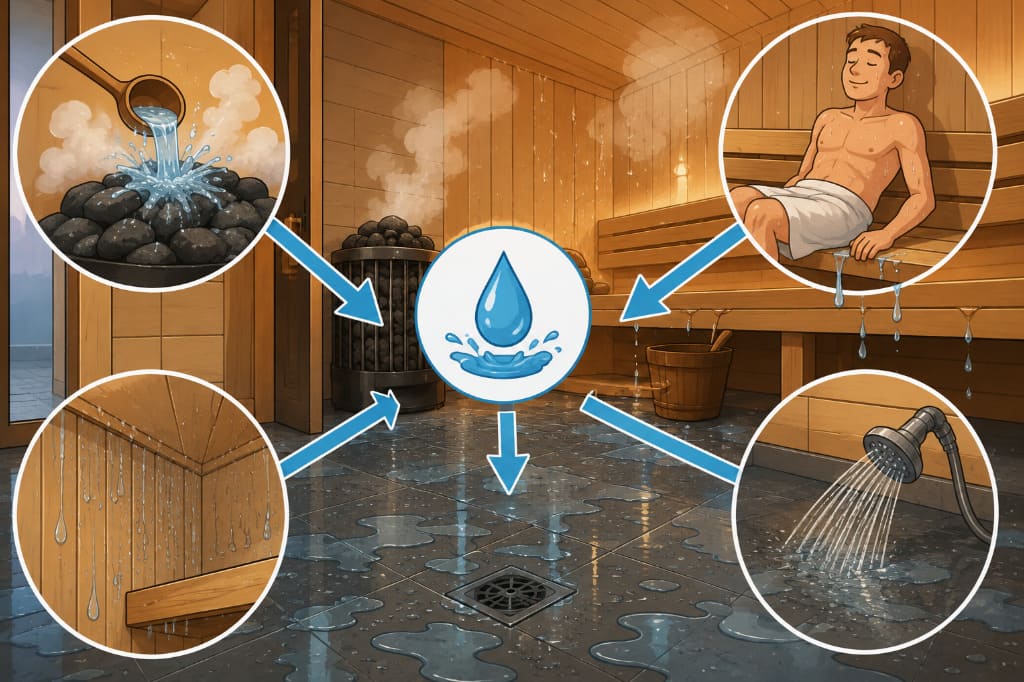
In a private sauna, the odd splash dries between uses. In a hotel or gym sauna running twelve hours a day, the floor is effectively always wet. That constant exposure is why the floor can't be treated as a dry timber base with a bit of water resistance — it has to genuinely contain, guide, and remove water as its core function. Everything that follows is built on understanding that the water never stops coming.
The Floor's Three Jobs — and Why Order Matters
These three jobs aren't a checklist of separate features; they're a sequence, and each depends on the one before it.
A sauna floor must contain water (so it can't reach the structure), guide water (so it can't pool on the surface), and remove water (so it leaves the room entirely). They work in order: containing keeps the building safe, guiding keeps the surface usable, and removing completes the cycle. A floor that does one or two but not all three will still fail.
Think of it as a chain. Waterproofing with no slope leaves standing water on a sealed floor. Slope with no drain just moves water to a corner where it sits. A drain with no waterproofing lets the overflow soak the structure. The three only work together — which is exactly why the rest of this guide takes them one at a time, in that order.
Job 1 — Containing Water: The Waterproof Membrane
The first job is the one that protects the building itself, and it happens out of sight beneath the finished floor.
Containing water means installing a continuous waterproof membrane[^2] over the subfloor and beneath the finished surface, turned up the surrounding walls by 100–150mm to form a watertight tray. This membrane — a liquid-applied or sheet system rated for wet areas — is what stops water reaching the structure. It must be unbroken at the drain, the corners, and the wall junctions.
The membrane is the single most important element in the floor, because it's the layer that keeps water out of the building. It has to be genuinely continuous, and its highest-risk points are exactly the places it's easiest to rush:
- At the drain — the membrane must bond tightly to the drain flange with zero gap.
- At corners — reinforce with tape or fillets; corners flex and crack.
- At the wall-to-floor junction — this is where the floor's waterproofing meets the wall assembly. The wall's own vapor barrier, covered in our sauna insulation and vapor barrier guide, and the floor membrane must overlap so no unprotected seam is left.
Use systems rated for wet areas and follow tile-industry guidance such as the Tile Council of North America[^3]. Because this layer is buried, a fault in it stays hidden until water damage appears elsewhere — so it has to be right before anything covers it.
Job 2 — Guiding Water: Getting the Slope Right
Once water can't reach the structure, the next job is making sure it doesn't just sit on top of a perfectly sealed floor.
Guiding water means sloping the finished floor toward the drain at a gradient of 1:50 to 1:100 — roughly 1 to 2cm of fall per metre. The slope is formed in the screed beneath the finished surface so that every point of the floor drains. Too little slope leaves standing water that breeds bacteria such as Legionella[^4]; too much is uncomfortable and a trip hazard.
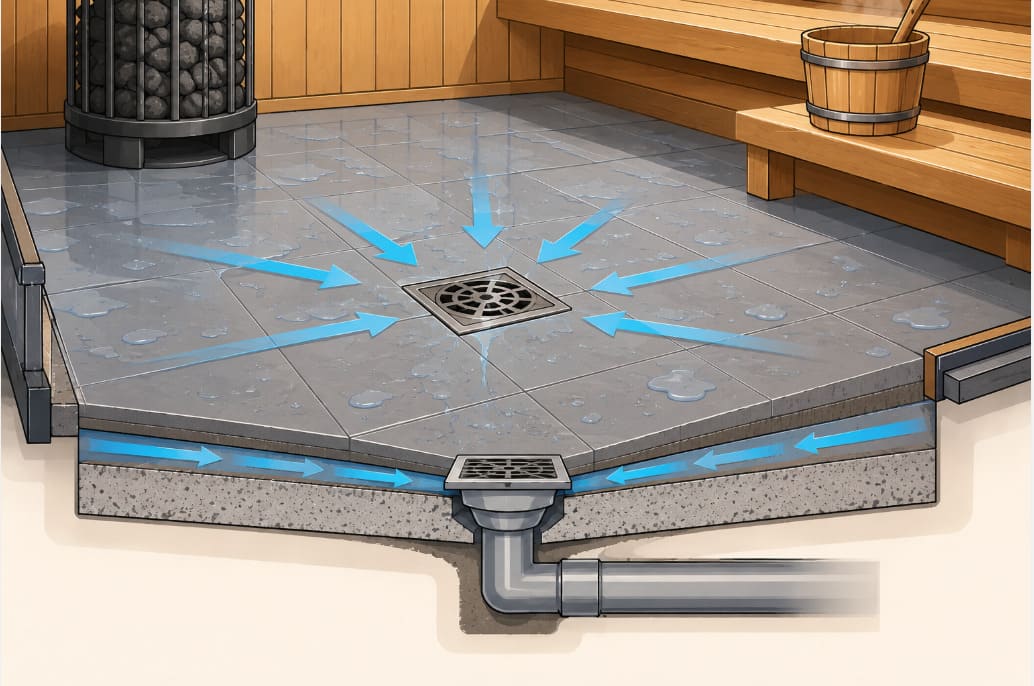
A gradient of about 2% (1:50) is a reliable target for a shower-connected sauna floor, easing toward 1% on larger, gentler falls. The one rule that matters: there can be no flat spots or low points where water collects. Form the fall in the mortar bed or screed, and check it with a level before the finished surface goes down. Standing water isn't just unpleasant underfoot — it's the visible sign that Job 2 wasn't done, and it turns a waterproof floor into a stagnant one.
Job 3 — Removing Water: The Drain
Contained and guided, the water now needs somewhere to go — which is the drain's entire purpose.
Removing water means fitting a floor drain at the low point of the slope. A drain is essential in any commercial sauna and mandatory where it connects to showers or a wet area. It should be corrosion-resistant (stainless steel is standard), have a water trap[^5] to block sewer odours, sit away from where bathers walk, and have a removable grate for cleaning.
The drain is what makes daily wash-down possible and keeps the floor from becoming a shallow pool. Its requirements are specific:
- Material — stainless steel or equivalent, to handle heat, moisture, and cleaning chemicals.
- Trap — a P-trap or equivalent, so sewer gas can't rise into the room.
- Position — at the lowest point, away from foot traffic and seating, often near the entrance.
- Access — a removable grate, because hair and debris collect fast in any wet area.
- Capacity — sized for wash-down flow, not just occasional drips.
One well-placed drain suits most single sauna rooms; larger rooms or full wet suites may need more. This is where Job 3 starts to overlap with the wider room — because in most commercial builds, the sauna's water doesn't drain in isolation.
The Flooring Guests Stand On: Materials, Mats and Slip Safety
The three water jobs happen mostly below the surface. The flooring itself has its own requirements — it has to be waterproof-compatible, heat-stable, and safe under wet bare feet.
The best commercial sauna flooring is tile (porcelain or stone) or sealed concrete: both work over the membrane, handle heat, clean easily, and can be made slip-resistant. Timber duckboards or slip-resistant sauna floor mats may sit on top for comfort and grip, but wood and mats are comfort-and-safety layers only — never the primary waterproof floor. And because the flooring combines water, heat, and bare feet, it must be genuinely slip-resistant — a real safety and liability issue in a commercial setting.
| Flooring option | Waterproof (over membrane) | Slip resistance | Cleaning | Verdict |
|---|---|---|---|---|
| Porcelain / stone tile | ✅ | ✅ Textured / matt | Easy | ✅ Standard choice |
| Sealed concrete | ✅ | 🟡 Needs finish | Easy | ✅ Good option |
| Timber duckboard (on top) | ❌ Surface only | ✅ | Lift to clean | 🟡 Comfort layer only |
| Sauna floor mats (on top) | ❌ Surface only | ✅ Extra grip | Lift / hose down | 🟡 Comfort & safety only |
| Solid wood floor | ❌ | 🟡 | Hard | ❌ Never as primary |
For slip safety, specify a wet-barefoot rating (such as R10–R11 or a suitable DCOF value), choose smaller tiles so grout lines add grip, and avoid large glossy tiles. Removable timber duckboards or sauna floor mats can be laid over the tile for a warmer, more comfortable feel and extra grip underfoot, and lifted out to dry and clean — but the drained, waterproof tile or concrete beneath them is what does the three real jobs. Mats and duckboards add comfort and safety on top; they never replace the waterproof floor.
Choosing the Right Wood for Floor Duckboards
If you do use timber duckboards over the waterproof floor, the wood species matters — this layer gets wet daily and sits in direct foot contact, so it needs to resist moisture, warping, and rot.
The best woods for sauna floor duckboards are thermally modified timber[^6] (such as thermally treated aspen) and naturally rot-resistant species like Western Red Cedar[^7]. Thermal modification makes the wood dimensionally stable and moisture-resistant, while cedar's natural oils resist rot and mould. Untreated pine or spruce is fine for bench framing but tends to warp and discolour when used as a floor grate that's wet every day.
Because the duckboard is the one part of the floor guests actually stand on, it's worth specifying properly: a heat-stable, rot-resistant timber that stays flat and clean over years of daily use. This is where the choice of wood — not just the fact that it's wood — makes the difference. ROC Sauna-Solution supplies genuine sauna-grade timber, including thermally modified and cedar options suited to duckboards, benches, and interior paneling; if timber duckboards are part of your build, talk to us about the right species for a wet floor.
When the Sauna Meets the Shower and Wet Area
In most commercial builds the sauna doesn't stand alone — and the moment it connects to showers, all three jobs have to work across the whole wet zone, not just one room.
When a sauna connects to showers or a wet area, the containing, guiding, and removing must be designed as one continuous system. The waterproof membrane runs through the entire wet zone, floors slope so water never flows from the shower into the sauna, and each area drains independently without cross-flow. This is a design decision to settle early — retrofitting continuous waterproofing later is difficult and costly.
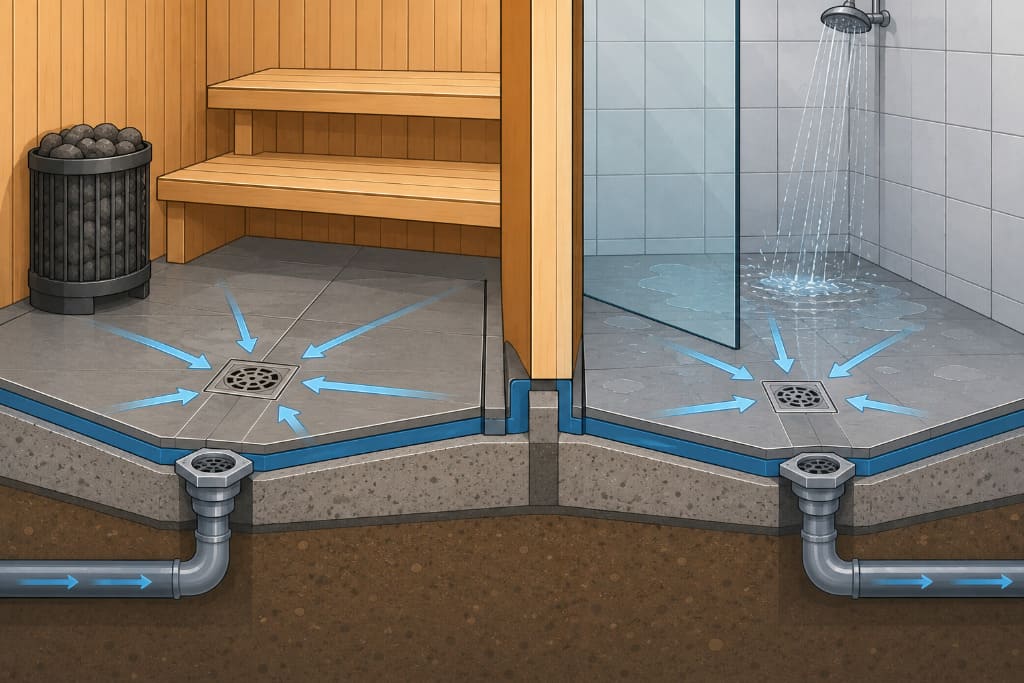
Guests move between sauna, shower, and rest areas, so the floors have to cooperate: one continuous membrane across the zone, slopes set so every area sheds water to its own drain rather than pushing it next door, and enough drainage capacity for the whole wet room. The three jobs simply scale up from one room to the whole area. For how the sauna fits into the wider guest journey and spa layout, see our hotel sauna planning guide.
Getting It Right on Site: When to Check Each Job
Because two of the three jobs are buried under the finished floor, the only chance to verify them is during the build — in the right order.
Each job must be checked at its own stage, before the next covers it: confirm the membrane is continuous and turned up the walls before the screed goes on, confirm the slope runs to the drain with no flat spots before tiling, and confirm the drain is corrosion-resistant, trapped, and accessible during rough-in. Once the floor is finished, all three become invisible until they fail.
| Job | Check | Inspect at this stage |
|---|---|---|
| Contain | Membrane continuous, sealed to drain, up the walls | Before screed |
| Guide | 1–2% slope to drain, no flat spots | Before tiling |
| Remove | Drain corrosion-resistant, trapped, accessible | During rough-in |
| Flooring | Slip-rated tile / concrete specified | At material selection |
For wellness and health-resort renovation contractors, the floor is usually the biggest unknown in an existing building — old membranes may have failed, drains may be badly placed, and slopes may be wrong or absent. Budget to open up, inspect, and rebuild the floor to do all three jobs properly, rather than tiling over an unknown. A floor failure after reopening is the most expensive problem a renovation can inherit.
Where Sauna Floors Fail
Almost every sauna floor failure is really a failure of one of the three jobs — here's how they map.
The most common failures are: a broken or missing membrane (fails to contain), insufficient or absent slope (fails to guide), no drain or a poorly placed one (fails to remove), wood used as the primary floor, and slippery flooring. Each one traces back to one of the floor's three jobs going undone.
| # | Mistake | Job it fails |
|---|---|---|
| 1 | No / incomplete membrane | Contain → water into structure |
| 2 | Membrane not sealed to drain or walls | Contain → leaks at weak points |
| 3 | Insufficient or no slope | Guide → standing water, bacteria |
| 4 | No drain or badly placed | Remove → pooling, can't clean |
| 5 | Wood as primary floor | Contain → rot |
| 6 | Slippery flooring | Surface → slip injury, liability |
Seen this way, "getting the floor right" isn't a long list of unrelated rules — it's making sure water is contained, guided, and removed, with safe flooring on top. Miss any one and the floor fails at that job.
How ROC Sauna-Solution Supports Commercial Sauna Builds
The floor is easier to get right when the equipment and the build specification come from one experienced source.
ROC Sauna-Solution supplies commercial sauna equipment and supports contractors, hotel project teams, and wellness/health-resort renovation contractors with correct build specifications — including how the sauna integrates with the floor's waterproofing, slope, drainage, and the wider wet area. We help ensure the sauna performs and lasts from the floor up.
We work with project contractors and renovation specialists across 50+ countries, supplying genuine Harvia[^8] heaters, control units, steam generators, timber, and accessories, with equipment specified to suit a properly waterproofed and drained sauna — whether it's a compact room with the Harvia The Wall or a larger installation around the Harvia Vega Pro. Send us your project and we'll match the equipment to your build.
Conclusion
Build a commercial sauna floor by following the water. Contain it with a continuous membrane turned up the walls, guide it with a 1–2% slope so nothing pools, and remove it through a corrosion-resistant, trapped drain — then finish with slip-resistant tile or concrete flooring, add mats or duckboards on top for comfort, and extend all three jobs across the wet area where it meets the showers. Check each job at its own stage, before it's covered up. Do that, and the floor does exactly what a commercial sauna needs of it: it manages water for decades of daily use, quietly and completely.
Planning or renovating a commercial sauna? Send ROC Sauna-Solution your project details for equipment specified to suit a properly waterproofed and drained build. Start your project enquiry here. You can also ask our AI assistant about sauna floor and drainage requirements.
Frequently Asked Questions
Does a commercial sauna need a floor drain? Yes. A floor drain is essential in any commercial sauna and mandatory where it connects to showers or a wet area. It removes splashed and condensed water and lets staff wash the floor down daily. Use a corrosion-resistant drain such as stainless steel, with a water trap to block sewer odours, positioned at the lowest point of the sloped floor.
How much slope does a sauna floor need? A commercial sauna floor should slope toward the drain at roughly 1:50 to 1:100 — about 1 to 2cm of fall per metre. Around 2% (1:50) is a reliable target for a shower-connected floor. Too little leaves standing water; too much is uncomfortable underfoot. The fall is built into the screed beneath the finished surface so every point of the floor drains.
Do you need to waterproof a sauna floor? Yes. A commercial sauna floor needs a continuous waterproof membrane over the subfloor and beneath the finished surface, turned up the walls to form a watertight tray. Without it, daily water penetrates the structure below and causes hidden rot. The membrane must be continuous and sealed tightly at the drain, corners, and wall junctions.
What is the best flooring for a commercial sauna? Tile (porcelain or stone) or sealed concrete are the best sauna flooring options — both are waterproof over a membrane, heat-stable, easy to clean, and can be made slip-resistant. Removable timber duckboards or sauna floor mats may be placed on top for comfort and grip, but wood should never be the primary waterproof floor. The flooring is a wet-area surface first and a comfort surface second.
Should I use sauna floor mats? Sauna floor mats are a good comfort-and-safety layer on top of a proper waterproof floor: they add grip and a warmer feel underfoot, and can be lifted out to hose down and dry. But mats are never a substitute for a waterproofed, sloped, and drained floor beneath them — they sit on top of the tile or concrete that does the real work of containing, guiding, and removing water.
Can I use a wood floor in a commercial sauna? Not as the primary floor. Wood cannot provide reliable waterproofing under daily commercial water exposure and will eventually rot. The waterproof floor should be tile or sealed concrete over a membrane. Removable timber duckboards can be laid on top for a warmer feel and lifted out to clean and dry, but the drained, waterproof surface beneath them is what protects the building.
How does a sauna floor connect to the shower area? When a sauna adjoins showers or a wet area, the waterproofing and drainage should be designed as one continuous system: the membrane runs through the whole wet zone, floors slope so water never flows from the shower into the sauna, and each area drains independently without cross-flow. This must be planned early, as retrofitting continuous waterproofing later is difficult and expensive.
About ROC Sauna-Solution
ROC Sauna-Solution is an official authorized Harvia distributor and commercial sauna sourcing partner based in China, with over 12 years of experience supplying sauna projects worldwide. We help hotels, spas, resorts, gyms, project contractors, and wellness/health-resort renovation contractors across 50+ countries build commercial saunas that perform and last — supplying genuine certified Harvia heaters, control units, steam generators, timber, stones, and accessories, with equipment specified to suit properly built wet-area floors, full technical documentation, CE/ETL/RoHS certification, OEM options, and technical and after-sales support.
References
[^1]: Löyly — steam produced by throwing water on hot sauna stones. Wikipedia. https://en.wikipedia.org/wiki/L%C3%B6yly [^2]: Waterproofing — membrane systems used to keep water out of building structures and wet areas. Wikipedia. https://en.wikipedia.org/wiki/Waterproofing [^3]: Tile Council of North America — tile-industry installation standards for wet areas. https://www.tcnatile.com/ [^4]: Legionella — bacteria that thrive in stagnant, warm water. Wikipedia. https://en.wikipedia.org/wiki/Legionella [^5]: Trap (plumbing) — water seal for blocking sewer gas. Wikipedia. https://en.wikipedia.org/wiki/Trap_(plumbing) [^6]: Thermally modified wood — dimensional stability and moisture resistance. Wikipedia. https://en.wikipedia.org/wiki/Thermally_modified_wood [^7]: Western Red Cedar (Thuja plicata) — natural rot resistance. Wikipedia. https://en.wikipedia.org/wiki/Thuja_plicata [^8]: Harvia — Official sauna heater manufacturer. https://www.harvia.com/en/