When a commercial sauna takes forever to heat, runs the heater non-stop, or shows mould and rot within a few years, the cause is almost never the heater. It's the wall. Insulation and the vapor barrier are the two layers that decide whether a sauna reaches temperature quickly, holds it efficiently, and survives years of daily commercial use — or becomes a slow, energy-hungry structure that fails from the inside out. For contractors, hotel project teams, and wellness renovation specialists, getting the wall assembly right is the single highest-leverage decision in the build. This guide covers the materials, R-values, vapor barrier, and correct layer order for commercial sauna construction.
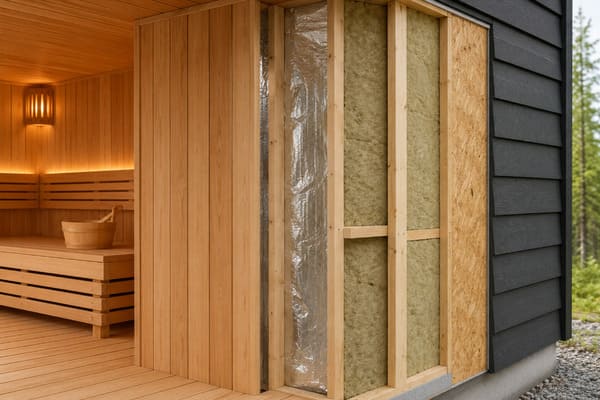
A commercial sauna wall is built in a specific layer order: framing with insulation (mineral wool is the standard), an aluminum foil vapor barrier on the warm interior side, a furring-strip air gap, then tongue-and-groove paneling. Walls target roughly R-13 to R-23 and ceilings R-26 to R-38, with the ceiling always insulated more heavily than the walls. Every foil seam and penetration must be sealed with aluminum tape, or moisture will destroy the wall from within.
Why Sauna Insulation Is Different From Normal Construction
Before the materials, it's important to understand why a sauna wall can't be built like an ordinary heated room.
A sauna combines extreme heat (typically 70–100°C / 160–210°F) with sudden bursts of humidity when water hits the stones. The temperature difference across the wall can exceed 80°C, driving moisture aggressively outward. Standard residential wall practices can't handle this, so sauna walls need heat-stable insulation and a true vapor barrier, not an ordinary vapor retarder[^1].
In a normal building, moisture drive is mild. In a sauna, the aggressive moisture drive means any gap or wrong material lets steam into the wall cavity, where it condenses and causes mould, rot, and failed insulation. This is why sauna-specific construction knowledge matters — and why a general contractor unfamiliar with saunas often gets it wrong.
Choosing the Right Insulation Material
The material in the stud cavity does the heavy lifting for heat retention, and not every insulation belongs in a sauna.
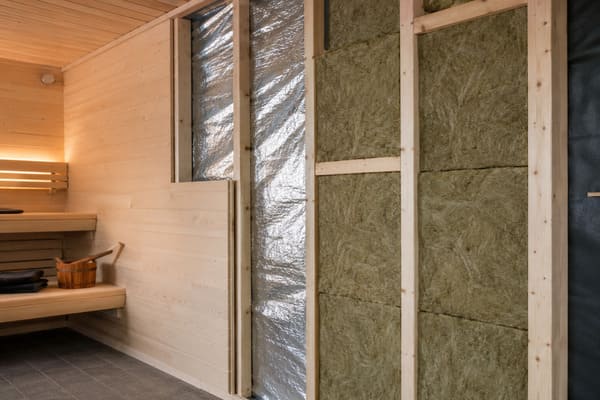
Mineral wool (rock wool) is the standard for commercial saunas: it withstands temperatures above 1,000°C without degrading[^2], is naturally hydrophobic so it dries without losing performance, resists mould, and is non-combustible. Fiberglass is a cheaper option but loses R-value if it gets damp. Rigid foam has a high R-value but must never sit on the hot side of the wall, as it can off-gas and has a low service temperature.[^3]
| Material | R-value / inch | Max service temp | Moisture behaviour | Sauna use |
|---|---|---|---|---|
| Mineral wool | R-3.0 – R-4.2 | 1,000°C+ | Hydrophobic, dries out | ✅ Standard choice |
| Fiberglass | R-3.2 – R-3.8 | ~540°C (fibres) | Absorbs moisture, loses R | 🟡 Budget only |
| Rigid foam (XPS) | R-5.0 | ~74°C | Good, but combustible | ❌ Exterior/floor only |
For any commercial sauna, mineral wool is the correct specification. Its heat resistance and moisture behaviour make it the material used in professional sauna construction across Finland and Europe [Rockwool]. The small extra cost over fiberglass is negligible on a commercial project and pays back in durability. Rigid foam belongs only on exterior sheathing or floors — never directly behind the interior paneling.
R-Value Targets: Walls, Ceiling and Floor
How much insulation you need depends on where the sauna sits and the climate — but one rule is universal.
Target roughly R-13 to R-23 for walls and R-26 to R-38 for the ceiling, pushing higher in cold climates and for outdoor structures. The ceiling should always have at least 50% more R-value than the walls, because heat rises and the ceiling loses the most energy. Under-insulating the ceiling is the most common and most costly mistake in sauna construction.
| Surface | Indoor / mild | Cold climate / outdoor |
|---|---|---|
| Walls | R-13 – R-15 | R-19 – R-23 |
| Ceiling | R-26 – R-30 | R-30 – R-38 |
| Floor | Optional (slab) | R-10 – R-19 (raised) |
R-value is the measure of resistance to heat flow — the higher the number, the better the wall holds heat, as defined by standards bodies like the U.S. Department of Energy. For commercial projects with heavy daily use, insulate to the upper end of these ranges: the energy saved over years of operation far outweighs the small extra material cost.
The Vapor Barrier: Why Aluminum Foil Is Non-Negotiable
If insulation is the muscle, the vapor barrier is the shield — and in a sauna, only one material qualifies.
The vapor barrier must be aluminum foil, installed on the warm (interior) side of the insulation. Aluminum does two jobs at once: it blocks moisture almost completely (a perm rating near zero)[^4] and reflects 95–97% of radiant heat back into the room[^5], improving efficiency. Plastic (polyethylene) sheeting is never acceptable in a sauna — it off-gasses at high temperatures, provides no heat reflection, and becomes brittle.
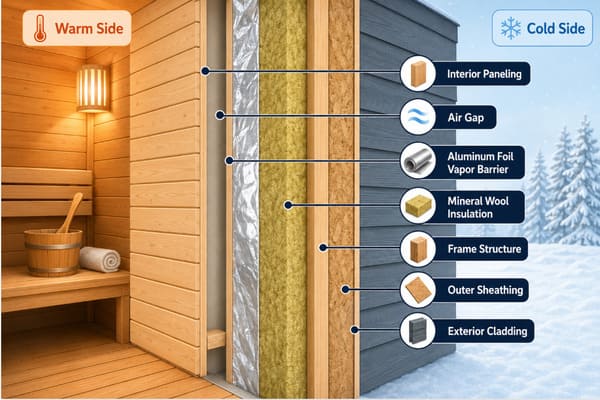
Aluminum melts at around 660°C, far above any sauna temperature, and won't off-gas or support mould. The foil must go on the warm side — between the insulation and the interior paneling. Installed on the cold side, it traps moisture inside the wall cavity, causing exactly the hidden rot it's meant to prevent. This single placement rule is one of the most common failures in DIY and non-specialist builds.
The Correct Wall Assembly Order
Each layer has a job, and reversing or skipping any one compromises the whole wall. Here is the correct order, from the structure inward.
The correct sauna wall assembly from the outside in is: (1) framing with mineral wool insulation in the cavities, (2) aluminum foil vapor barrier on the warm side, seams and penetrations sealed, (3) furring strips creating a 20–25mm air gap, and (4) tongue-and-groove interior paneling. The air gap is essential — the foil only reflects heat across an air space, and the gap lets any condensation dry.
| Layer | Component | Function |
|---|---|---|
| 1 | Framing + mineral wool | Thermal resistance |
| 2 | Aluminum foil vapor barrier | Moisture block + heat reflection |
| 3 | Furring strips (air gap) | Enables reflection + drying |
| 4 | Tongue-and-groove paneling | Finished interior surface |
The furring-strip air gap (roughly 20–25mm) is the step non-specialists skip most often — and without it, the foil can't reflect heat and moisture gets trapped against the paneling. It's inexpensive and essential. Start the foil at the ceiling and overlap the wall foil beneath it, so any condensation sheds downward.
Sealing: Where Most Sauna Walls Fail
A vapor barrier is only as good as its seams. This is the detail that separates a wall that lasts decades from one that rots in a few years.
Every foil seam must overlap by at least 50–150mm and be sealed with aluminum tape — never standard duct tape, which fails at sauna temperatures. Every penetration for wiring, lighting, or ventilation must be cut tightly and sealed all around. A single unsealed gap concentrates moisture and causes damage out of all proportion to its size.
Pay special attention to:
- Seams — overlap generously, tape the full length with aluminum tape.
- Corners — high-stress areas; fold and tape carefully.
- Penetrations — every wire, light, and vent sealed all around. Plan electrical routing before the foil goes up; for the wiring itself see our commercial sauna electrical requirements guide.
- Floor and ceiling junctions — seal the full transition so moisture can't wick in.
Budget extra time and tape for sealing. It is trivially cheap compared to rebuilding a rotted wall.
Thermal Bridges and the Heater Wall
Two technical details separate a good sauna wall from a great one.
Wood studs conduct more heat than the insulation between them (a "thermal bridge"), so in cold climates add a continuous layer of exterior rigid foam to break the bridge. And the wall behind the heater needs the most insulation, not the least — use mineral wool there (never foam), keep the vapor barrier intact, and maintain the heater manufacturer's required clearances.
Some builders wrongly reduce insulation behind the heater over heat-damage fears; in fact that wall takes the most thermal load and needs full mineral wool protection. Getting insulation right also directly affects heater sizing — a well-insulated room needs a smaller heater, which is why our sauna heater size guide factors insulation into the kW calculation.
Insulation and Ventilation Work Together
Insulation without ventilation creates a moisture trap — the two must be designed as a pair.
A well-insulated, well-sealed sauna needs proper ventilation to let moisture escape after use. A low fresh-air intake near the heater and a high exhaust on the opposite wall create airflow during sessions, and opening vents after use dries the room. Without ventilation, the sealed wall traps humidity and mould develops despite a perfect vapor barrier.
The insulation and vapor barrier keep heat in and moisture out of the wall; ventilation removes moisture from the room. Both are required. Every vent penetration through the insulated wall must, of course, be sealed around its perimeter with foil tape like any other penetration.
Common Commercial Sauna Insulation Mistakes
Almost every insulation failure traces back to the same short list of errors.
The most common mistakes are: using plastic sheeting instead of aluminum foil, installing the vapor barrier on the wrong (cold) side, skipping the furring-strip air gap, under-insulating the ceiling, leaving gaps around penetrations, compressing insulation, and using rigid foam behind the interior paneling.
| # | Mistake | Consequence |
|---|---|---|
| 1 | Plastic instead of aluminum foil | Off-gassing, no reflection, failure |
| 2 | Vapor barrier on cold side | Moisture trapped, hidden rot |
| 3 | No air gap | No heat reflection, trapped damp |
| 4 | Under-insulated ceiling | Slow heat-up, high running cost |
| 5 | Unsealed penetrations | Moisture channels into wall |
| 6 | Compressed insulation | Reduced R-value |
| 7 | Foam behind paneling | Off-gassing, heat damage |
For a commercial project running daily, any one of these can mean a rebuild within a few years. This is exactly why the wall assembly should be specified and built by people who understand saunas — not treated as ordinary construction.
What B2B Buyers and Project Owners Should Check
You may not build the wall yourself — but as the buyer, hotel project owner, or renovation contractor, you're responsible for making sure it's built right. You don't need to lay the insulation; you need to know what to verify before it's covered up.
Even if a general contractor does the construction, the buyer should confirm five things before the interior paneling goes on: mineral wool (not fiberglass or foam) is used in the cavities, the vapor barrier is aluminum foil on the warm side, the ceiling is insulated more heavily than the walls, all seams and penetrations are sealed with aluminum tape, and a furring-strip air gap sits behind the paneling. Inspect the wall assembly before it's closed up — afterwards, mistakes are hidden until they fail.
The critical point is timing: the single most important inspection happens after the foil goes up but before the paneling is installed. Once the interior is finished, every one of these details is invisible. A quick check at the open-wall stage protects the entire investment.
| Buyer's checkpoint | What to confirm | When |
|---|---|---|
| Insulation material | Mineral wool, correctly filled, not compressed | Before foil |
| Vapor barrier | Aluminum foil, warm side, not plastic | Before paneling |
| Ceiling insulation | Heavier than walls (higher R-value) | Before foil |
| Sealing | All seams & penetrations taped | Before paneling |
| Air gap | Furring strips behind paneling | During paneling |
| Photos | Documented record of each stage | Throughout |
A few practical tips for buyers and project owners:
- Specify it in the contract. Name mineral wool, aluminum foil, and the air gap in the build spec — don't leave it to a contractor who may treat the sauna as an ordinary room.
- Confirm your contractor has built saunas before. Sauna wall assembly is not standard construction; ask for previous sauna projects, not just general experience.
- Take photos at the open-wall stage. A dated photo record of the insulation and sealed vapor barrier is your protection if problems appear later.
- Match the equipment to the build. A properly insulated room needs a smaller heater — confirm heater sizing against the finished insulation, not a generic estimate.
For renovation contractors upgrading existing wellness spaces, this stage matters even more: you rarely know how the original wall was built until it's opened up. Budget time to inspect and, where needed, rebuild the assembly correctly rather than paneling over an unknown structure.
How ROC Sauna-Solution Supports Commercial Sauna Builds
Getting the wall right is easier when the equipment and the specification come from one source.
ROC Sauna-Solution supplies genuine commercial sauna equipment and supports contractors, hotel project teams, and wellness/health-resort renovation contractors with correct specifications — heater sizing matched to insulation, sealed penetrations for wiring and heaters, and guidance on the wall assembly that protects the structure. We help ensure the sauna you build performs and lasts.
We work with project contractors and renovation specialists across 50+ countries, supplying genuine Harvia heaters, control units, steam generators, timber, and accessories — with the heater specified to suit a properly insulated room, whether it's a compact Harvia The Wall or a robust Harvia Vega Pro. Send us your project and we'll match the equipment to your wall build, so the heater, insulation, and vapor barrier work together as one system.
Conclusion
The wall — not the heater — decides whether a commercial sauna heats fast, runs efficiently, and lasts. Get four things right and the rest follows: mineral wool insulation, an aluminum foil vapor barrier on the warm side, a furring-strip air gap, and every seam and penetration sealed with aluminum tape. Insulate the ceiling more heavily than the walls, inspect the assembly before the paneling closes it up, and match the heater to the finished room. Do that, and you build a sauna that performs from day one and survives years of daily commercial use.
Planning or renovating a commercial sauna? Send ROC Sauna-Solution your project details and we'll match genuine Harvia equipment to your wall build — heater sizing to suit your insulation, sealed penetrations, and guidance on the assembly. Start your enquiry here. You can also ask our AI assistant how sauna insulation and vapor barriers work.
Frequently Asked Questions
What insulation is used in a commercial sauna? Mineral wool (rock wool) is the standard. It withstands temperatures above 1,000°C without degrading, is naturally hydrophobic so it dries without losing performance, resists mould, and is non-combustible. Fiberglass is a cheaper budget option but loses R-value if it gets damp, and rigid foam should never sit behind the interior paneling.
Which side does the vapor barrier go on in a sauna? The aluminum foil vapor barrier goes on the warm (interior) side of the insulation, between the insulation and the interior paneling. On the cold side it traps moisture inside the wall cavity, causing the hidden rot it's meant to prevent. This placement is one of the most common failures in non-specialist builds.
Why must a sauna use aluminum foil instead of plastic? Aluminum foil blocks moisture almost completely and reflects 95–97% of radiant heat back into the room, improving efficiency. It melts at around 660°C, far above any sauna temperature, and won't off-gas or support mould. Plastic (polyethylene) sheeting off-gasses at high temperatures, provides no heat reflection, and becomes brittle — so it's never acceptable in a sauna.
What R-value should a commercial sauna have? Target roughly R-13 to R-23 for walls and R-26 to R-38 for the ceiling, pushing to the upper end in cold climates and for outdoor structures. The ceiling should always have at least 50% more R-value than the walls, because heat rises and the ceiling loses the most energy.
Why does a sauna wall need an air gap? A furring-strip air gap of roughly 20–25mm sits between the foil vapor barrier and the interior paneling. The foil only reflects radiant heat across an air space, and the gap also lets any condensation dry rather than sitting against the wood. Skipping it is the step non-specialists miss most often.
What's the most important thing a buyer should check? Inspect the wall assembly after the foil goes up but before the paneling is installed. At that stage you can confirm mineral wool is used, the aluminum foil is on the warm side, the ceiling is insulated more heavily than the walls, all seams and penetrations are taped, and the air gap is in place. Once the interior is finished, every one of these details is hidden until it fails.
About ROC Sauna-Solution
ROC Sauna-Solution is an official authorized Harvia distributor and commercial sauna sourcing partner based in China, with over 12 years of experience supplying sauna projects worldwide. We support contractors, hotel project teams, wellness and fitness businesses, large project buyers, and wellness/health-resort renovation contractors across 50+ countries — supplying genuine certified Harvia heaters, control units, steam generators, timber, and accessories, with heater sizing matched to insulation, sealed penetrations for wiring and heaters, guidance on correct wall assembly, CE/ETL/RoHS certification, and technical and after-sales support.
[^1]: Insulating sauna walls with a vapor barrier. Saunatimes. https://www.saunatimes.com/building-a-sauna/if-our-sauna-walls-could-talk-insulate-with-vapor-barrier-or-let-them-breathe/ [^2]: Mineral wool fire and temperature performance. ROCKWOOL Technical Insulation. https://rti.rockwool.com/en/applications/marine-and-offshore/firesafe/ [^3]: Rigid foam (XPS) service temperature and data. Owens Corning FOAMULAR product data sheet. https://www.stocorp.com/wp-content/content/Products_TechService/Insulation/Product%20Bulletins/10021759-Owens%20Corning%20Foamular-CI-C-Product-Data-Sheet.pdf [^4]: Vapor retarders and perm ratings. Insulation Institute. https://insulationinstitute.org/im-a-building-or-facility-professional/commercial/installation-guidance/managing-moisture-in-commercial-construction/vapor-retarders/ [^5]: Emissivity and radiant heat reflection of aluminum. Wikipedia. https://en.wikipedia.org/wiki/Emissivity